The Event Setup menu is used to confirm the teams at the event, set up the competition fields, create the event schedule and matches for practice and qualification matches. This is typically one of the first steps completed when starting the event.
Finding Event Setup
The Event Setup menu is automatically loaded when you first open your event, but it can also be found in your Dashboard and in the left-hand navigation menu.
Team Setup
The Team Setup section will include all of the teams that are registered for the event. This automatically syncs from the event’s registration page.
- Select the Number of Divisions for the event. If you will be using more than one Division, please contact your RSM for further guidance.
- Verify the Competition Portal’s Team List.
- If there is any incorrect information about the team (i.e. Age Group, Team Name, Organization), this information will need to be changed in the Team’s account and cannot be manually changed in the Competition Portal.
- The Reset Teams button will automatically refresh the team list back to the original team list based on the event’s registration page. This can be used if a team is mistakenly removed from the Team Setup list and needs to be added back into the event.
- The Only checked-in Teams button can be used after the Team Check-in is completed to remove any teams that are not checked-in. This does not remove them from the event registration page - only the Competition Portal team list.
- The red X icon will remove a team from the Competition Portal’s Team List, but the team will remain in the event’s registration page list. If a team is removed from the Competition Portal Team List and needs to be added back, select the Reset Teams button.
- Select Save and Continue.
Field Setup
The Field Setup section is where the Skills Fields and the Teamwork Fields are created. The number of Skills and Teamwork Fields depend upon the event’s capacity and agenda. Contact your RSM if you need assistance with determining the number of fields needed for your event.
Field Setup is necessary to:
- Create the Field Timers and Audience Displays for each field type.
- Create the Teamwork match schedule
To complete Field Setup:
- Add the number of anticipated Skills Fields. It’s better to overestimate the number of Skills fields to ensure the Field Timers will be available.
- Use the “+” icon to add the Teamwork Field(s).
- Most events will either use one or two Teamwork Fields per Division.
- Fields names can be as simple as Field 1 and Field 2, or they can be customized to highlight an event sponsor or be something fun and engaging.
- Field name lengths are limited to 16 characters to ensure the field name fits on field signs and match schedules.
- Select Save and Continue.
Schedule Setup
The Schedule Setup section is where the Teamwork Practice and Qualification matches are created. Teamwork Elimination matches and Skills matches are not scheduled, so these matches are not included in the Schedule Setup section.
Scheduled Teamwork Matches:
- Practice Teamwork Matches: These are optional scheduled matches that are added at the Event Partner’s discretion. They do not count towards a Team’s ranking. If time permits, adding one round of Practice matches help teams and volunteers learn the flow of the event before the Qualification matches begin.
- Qualification Teamwork Matches: Qualification matches are required and count towards a Team’s ranking. See the Qualifying Criteria or ask your RSM for the required minimum number of Qualification Matches.
There are two methods to create the scheduled Teamwork matches:
- Schedule Helper: This is a simplified approach to scheduling matches and is recommended for beginners.
- Manually Enter Schedule Blocks: The schedule blocks are manually created by specifying block times, match types, and cycle times. This is optional and is only recommended for advanced users that have prior experience with creating time blocks.
Before starting to create the schedule by either method, it’s best practice to verify the number of teams. Most Event Partners will need to complete the Event Setup prior to Team Check-in. There is a process to regenerate the match schedule if teams do not attend the event. More information can be found in the Regenerate Schedule section.
Schedule Helper
- Enter the event date.
- Enter the time when scheduled matches (Practice or Qualification matches) will start.
- Enter the time when scheduled Qualification matches will end.
- This “end” time does not include Elimination Matches. Ensure you leave enough time to do Elimination matches after the scheduled Qualification Matches.
- These times should closely match what is on your posted event agenda.
Enter the number of Practice Teamwork matches per team. Leave this at zero if no Practice Matches will be scheduled.
- Enter the number of Qualification Teamwork matches per team.
- Select if your event will include a lunch break (Yes or No).
- It’s best practice to include a 30 - 60 minute lunch break. This provides an opportunity for teams and volunteers to take a well-deserved break. Also, scheduling a longer lunch break will provide cushion in your event schedule in case matches run longer than expected prior to lunch.
- Enter the start and end times of the lunch break.
- Select Generate Schedule.
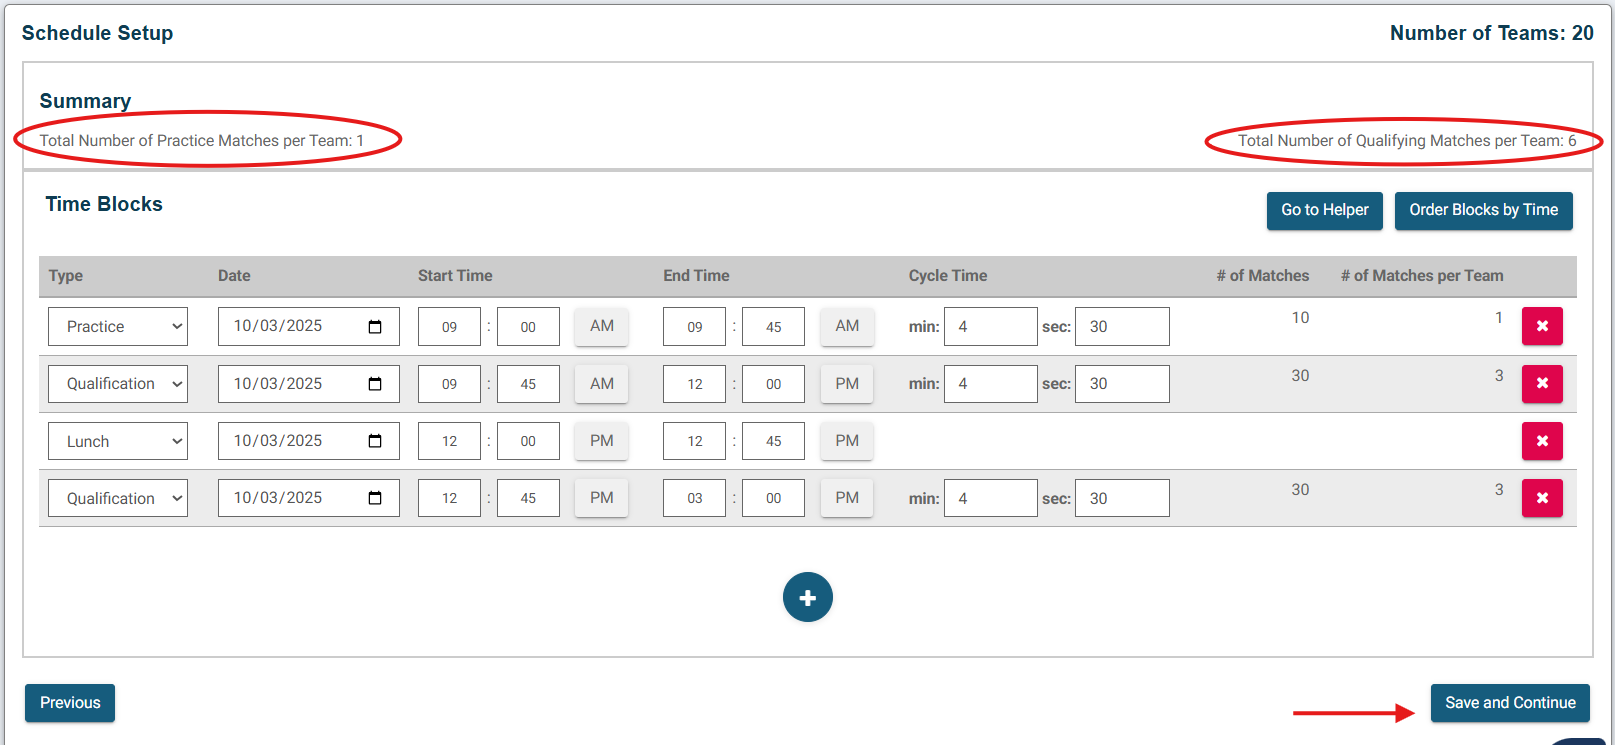
The example below shows an event with (1) Practice Match and (6) Qualification Matches per Team, and a 45 minute lunch break:
Schedule Helper Summary & Time Blocks
The next screen provides a summary of the schedule blocks that were automatically generated based on the information provided in the previous screen.
Important areas to review:
- Summary
- Verify the number of Practice and Qualification Matches per team.
- Time Blocks
- Type: The block type indicates what will be occurring during that time block. The types are Practice, Qualification and Lunch.
- Date: The date the time block will take place.
- Start & End Times: Times that the individual time blocks will start and end.
- Cycle Time: The time needed between when one match starts and the next match starts. This includes the time to complete a match and extra time to get ready to start the next match.
- New Event Partners should discuss with their RSM if the automatically generated cycle time is reasonable for their event. This depends upon the number of Teamwork fields, volunteer experience level, and the reset time for that season’s competition.
- Changes to the time blocks can be done directly in the time block fields or you can select Go to Helper to adjust the information in the Schedule Helper screen.
- If changes are made manually to the time blocks, this may affect the number of matches per team. Be sure to review the Summary area to review this information as you make changes.
- Select Save and Continue once the schedule settings have been verified.
Notes:
- If there are an odd number of teams, then it may be required for one team to play an extra match to ensure all teams get the opportunity to play the minimum number of matches. This will appear on the Match Schedule with an asterisk next to the Team that has the extra match. This extra match will not count towards the Team’s ranking.
- It’s common to have a longer cycle time for matches before lunch since it may initially take longer for volunteers and team to complete matches. Cycle times can be manually shortened for later blocks, but watch to see if this will increase the number of matches per team. If so, you may need to reduce the time block end time.
- If you get errors when manually adjusting the time block times, this may be due to invalid field information. For example, if the cycle time is manually increased too much, then there will not be enough time in that block to run matches. Also, be careful when adjusting start and end times manually to ensure they do not overlap with each other.
Manually Entering Time Blocks
Some users will prefer to create their scheduled match time blocks from scratch. This can be done by selecting Manually Enter Schedule Blocks in the Schedule Setup section.
- Use the “+” icon to create a new time block.
- Enter the time block field information.
- Type: The block type indicates what will be occurring during that time block. The types are Practice, Qualification and Lunch.
- Date: The date the time block will take place.
- Start & End Times: Times that the individual time blocks will start and end.
- Cycle Time: The time needed between when one match starts and the next match starts. This includes the time to complete a match and extra time to get ready to start the next match.
- Cycle times depend upon the number of teamwork fields, volunteer experience level, and the reset time for that season’s competition. If you are unsure what cycle times are reasonable for your event, contact your RSM for assistance.
- Review the number of Matches per Team created each time a time block is created.
- To remove a time block, select the red “x” icon associated with that time block.
- The Order Blocks by Time button will arrange the time blocks in order of time.
- Select Save and Continue once the schedule settings have been verified.
Create Matches
The Create Matches section is where the Practice and/or Qualification matches are generated based on the Schedule Setup information. If no Practice matches were added in the Schedule Setup, then only Qualification matches will appear on this screen.
While matches are being created, the buttons will lighten in color indicating that the system is working on that task. Wait until the green notification box appears before moving onto the next step.
- Select Create Practice Matches (if available). Wait until you see the green notification appear that matches have been generated successfully.
- Select Create Qualification Matches. Wait until you see the green notification appear that matches have been generated successfully.
- Optional: View Statistics shows various match information. This window shows the number of matches per team, match spacing, etc., and if there are concerns, the matches can be regenerated or you can go back to the scheduler to make changes. It’s very uncommon to need to make changes.
- Select Finish.
- Important: Make sure you wait to select the Finish button until after the green notification appears. Selecting the Finish button before the matches are finished being generated will result in no matches appearing on the match lists.